
The purpose of this article is to provide concrete countertop professionals with a simple, repeatable framework for testing the stain resistance of any sealer they use or are considering using on concrete countertops.
The goal of this procedure is to provide simple, repeatable and realistic tests whose results provide a common framework for an “apples to apples” comparison and evaluation of the stain-, heat- and scratch- resistance of various sealers.
All sealers should be identically tested and evaluated. The tests are designed to find the limits of a sealer’s performance. Each test simulates real-world conditions that can occur, and each test is simple to perform and easy to evaluate. Evaluation is based on simple criteria: Did the concrete etch? Did it stain? Did the sealer degrade? The results from each test are evaluated and scored using clear, consistent and objective scoring techniques. Each test result is compared to an untested area and assigned a score. The tallied results are normalized to yield a final score which permits the comparison of different sealers.
Keep in mind that not all of the strengths and weaknesses of sealers are quantified or addressed in this sealer testing program. Factors such as appearance, ease of application, cost, environmental issues, ease of repair, etc, are not tested. However these factors are important when choosing a sealer to use on your concrete countertops. Ranking in stain tests is not an indication of overall desirability of a sealer. It is merely a ranking of stain resistance.
The Importance of Doing Your Own Testing
The stain test methods are described in this article so that others can perform their own tests and compare their results with the results from this test program, and so that concrete countertop professionals can use this testing procedure to evaluate the stain resistance of any sealer they are considering using. Once the scratch and heat test procedures are published, this will provide a complete framework for testing the practical performance of concrete countertop sealers.
The Concrete Countertop Institute recommends that you, the concrete countertop maker, perform this test procedure on any sealer that you are considering using on client projects. This is not necessarily so that you can provide stain-resistance, but so that you know exactly how the sealer behaves on your concrete. You can use that information to tell clients what to expect and to develop the owner’s guide for your clients and the expectations wording in your contract.
Unfortunately, in the concrete countertop industry there are many sealers that do not perform as stated by the manufacturer, for one reason or another. They may have been repurposed from floors, where they worked well for the requirements of floors, but the manufacturer did not understand the requirements of countertops.
Recognize that many factors can affect the performance of a concrete sealer. A sealer that works well on one person’s concrete may not work well on your concrete due to a variety of factors including mix design, cure time and methodology and finishing methods. For example, you cannot apply an epoxy/urethane coating system to concrete polished to 3000 grit and expect it to adhere. Or, you may have an exotic admixture in your concrete that causes a penetrating sealer to behave differently on your concrete than on someone else’s concrete.
Application method is also critically important. There is a wide variety of methods that can be used, including anything from simple wipe on techniques to multi-part spraying techniques. Before you begin your testing, make sure that you are clear on the manufacturer-recommended application technique and any prerequisites such as surface preparation. Be aware that for the reasons stated above (floor sealer repurposing, for example), many manufacturers do not actually know how to apply their sealers to best effect on concrete countertops. You may need to develop your own application technique. Whatever technique you use, be sure to document it as part of your test results.
Lack of understanding by manufacturers and variations in concrete mixes, finishes and application techniques are why it is so important that you as a concrete countertop maker perform these tests and set your clients’ expectations. Ideally, this would be the sealer manufacturer’s responsibility. Realistically, it is your responsibility.
Stain Testing Procedure Background
Length of Exposure
These stain tests have different exposure lengths, because some substances take longer to affect the concrete. Testing stain resistance with a single, short exposure time, such as 5 minutes, is not adequate to simulate real world situations. For example, what if a client has a Cinco de Mayo party, and some lime juice runs underneath the blender and sits there undiscovered until the next morning? What if the client splashes tomato sauce on a spot next to the stove, and doesn’t clean it up until 3 hours later after the dinner party guests have left? By testing stain resistance over several time intervals, you get a much better sense of the expected real world behavior of your sealer.
The test scoring methodology, described below, takes into account the different testing timeframes, by adding up scores for four time increments. The method of scoring was chosen to expose the differences in performance between sealers and to reveal how and when a sealer breaks down. Adding up the scores for each of the four time increments rewards sealers that perform well against many staining agents and resist those agents for long exposure times.
Had only the score from a single time period been used (such as the 24 hour mark), it would have been harder to discern the true performance of different sealers. For example, if a finish resisted many stains through the 24 hour mark it would have had a high score. But, it would be difficult to tell the difference between a finish that failed early, say after only 15 minutes, versus a finish that failed later, say after about 8 hours. The results at 24 hours would have looked the same.
Test Scoring Methodology
Each test location is evaluated for certain characteristics. At the end of testing, you add up the scores for each characteristic, and then calculate a normalized percentage score for that characteristic. This allows quantitative and graphical comparison of scores for each sealer.
In the staining test procedure there are 14 substances evaluated against 3 criteria each worth 10 points. A maximum 30 points can be awarded for each staining agent, and there are 4 time periods tested. That means the maximum cumulative score is 14*30*4 = 1680 points. So if a particular sealer achieves a score of say, 1344 points out of 1680 points, then its normalized score would be 1344/1680, or 80%.
The detailed scoring system and analysis procedure are described in the test procedure later in this article.
When assigning scores, it is important to score all indications of change the same regardless of the severity. Do not attempt to weigh different degrees of change. Either the sealer stained or it didn’t. Scoring criteria are therefore based on clear-cut indications of change, whether that change was staining, dulling or water penetration. This helps to prevent subjective interpretation from affecting the scoring outcome. If a change was so subtle that it was difficult to tell it occurred, or if different people viewing the affected spot noticed or did not notice the change, then award the score for “no change”. This prevents borderline changes that could be interpreted one way or another from skewing the scoring.
Sealer Application
All sealers should be applied strictly according to manufacturer’s instructions or using other commonly used application methods that are fully documented.
Cure all sealers for at least 7 days prior to testing, and for the same amount of time. Most finishes are fully cured at or before 7 days, so this represents long term performance for many sealers.
Be sure to document the exact application procedure and how long the sealer was cured before testing. As explained above, your results may be heavily dependent on application procedure.
Definitions
- Stain: defined as a visual change in shade or color. May apply to changes in the concrete itself or in the coating applied to the sealer, or both. Stains can be temporary or permanent.
- Etching: defined as a physical change in the concrete surface due to chemical dissolution of the cement paste. Often appears as a light/white area that is slightly rougher, accompanied by broad, shallow pitting or erosion. Extreme etching exposes aggregate particles. Most etching is permanent.
- No Change: the surface looks exactly like it did before testing was performed.
- Temporary: referring to a visible change that can be completely reversed by a homeowner using common household items or cleansers. Temporary may also refer to the duration of a visible change. Stains or marks that fade over a short period (up to an hour) of time and leave no telltale mark are defined as temporary.
- Permanent: referring to a visible change that cannot be reversed by a homeowner using common household items or cleansers. Also refers to marks that do not fade or disappear over time.
- Penetration of water: means that water darkens the concrete in the tested area.
Here are some photos illustrating those definitions:
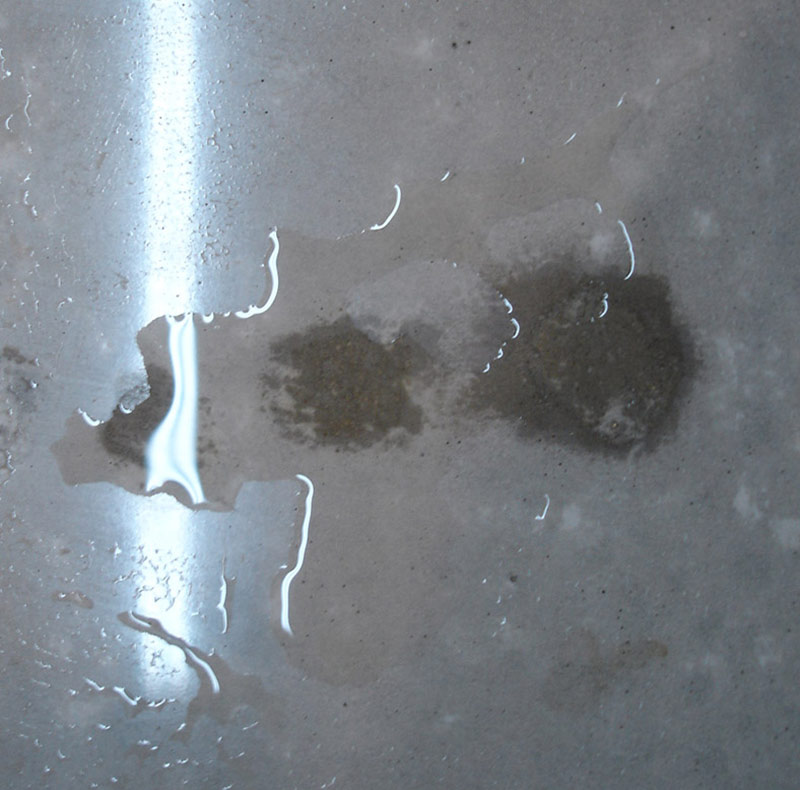
Water spots on concrete countertop due to water penetrating through the sealer in tested areas.

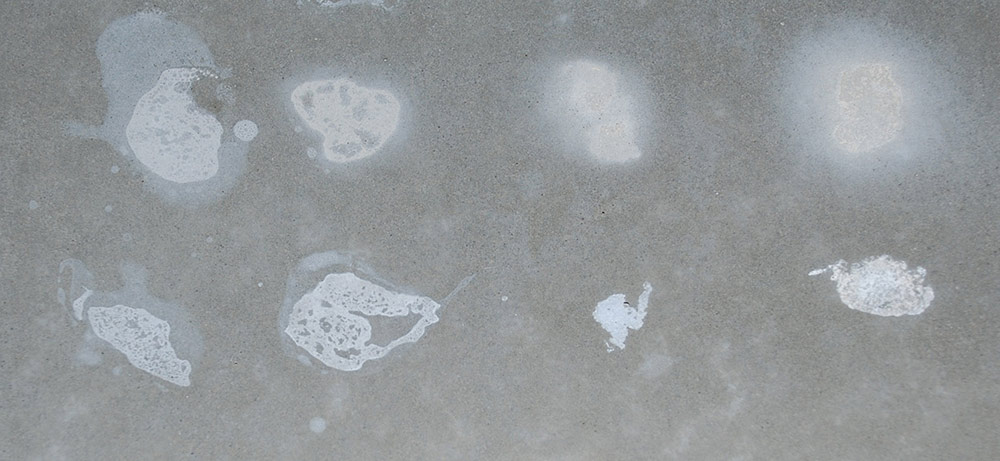
Stains from mustard (left), red wine (middle), and coffee (right).
Etching in concrete from vinegar (top row) and lemon juice (bottom row).
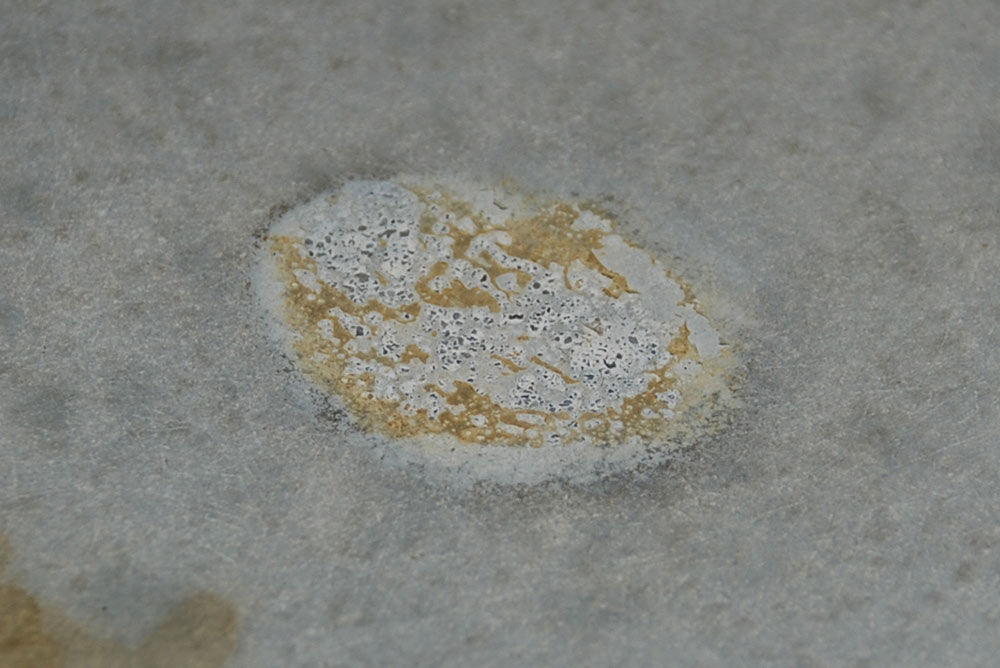
Severe etching and staining from Tabasco® sauce.
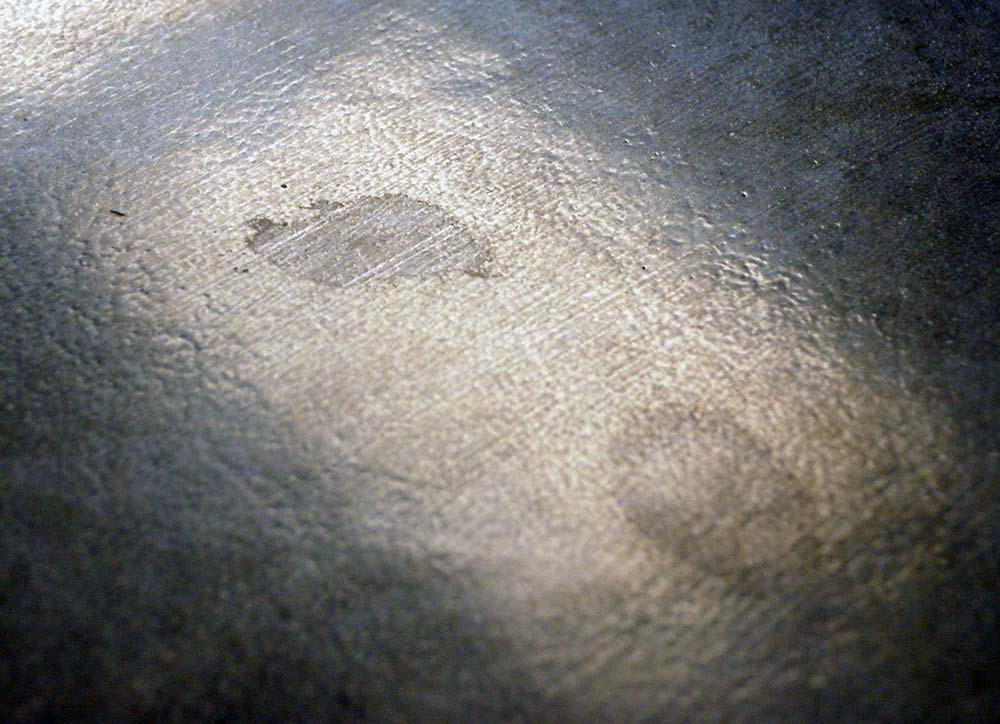
Dull spots in sealer.
How to Perform Stain Tests
Time Intervals
Test four time intervals: 15 minutes, 1 hour, 8 hours and 24 hours.
Substances
There are 14 substances prescribed in this stain testing procedure. Some substances belong to a combination of two or more categories.
Staining agents: substances that can potentially change the color or shade of the sealer, concrete or both. These were selected because they are harsh staining agents.
1. Mustard (yellow mustard)
2. Red wine (cabernet sauvignon)
3. Coffee (strong brew)
4. Tabasco® sauce (a brand of hot pepper sauce)
Solvents: substances that can potentially dissolve or damage the sealer
5. Water
6. Rubbing alcohol (isopropyl, 70%)
7. Acetone (100% – not nail polish remover)
8. Vegetable oil (canola)
Acids: substances that can potentially dissolve or etch the concrete, or damage the sealer
9. Vinegar (acetic acid)
10. Lemon juice (citric acid)
Cleansers: substances often used in the home for cleaning
11. Liquid dish soap
12. Bleach
13. Ammonia
14. “Greased Lightning” brand cleaner
Stain Test Procedure
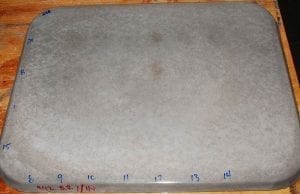
1. Prepare as many pieces of concrete as you need to complete your tests, using the exact same mix formula. Plastic food trays work well for pouring thin samples with an adequate area for testing. Mark each piece of concrete in permanent marker as follows:
– Across the bottom, write the numbers 1 through 14 (you may need 2 food tray sized samples for this). These numbers represent the 14 substances to be tested.
– Across the side, write the numbers 15, 1, 8 and 24. These represent the time periods of 15 minutes, 1 hour, 8 hours and 24 hours.
– On the edge, write the date and the sealer you are testing.
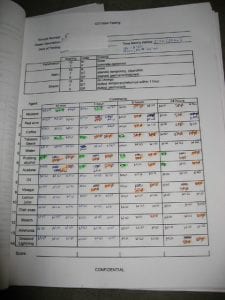
2. Prepare a sheet of paper to record test results.
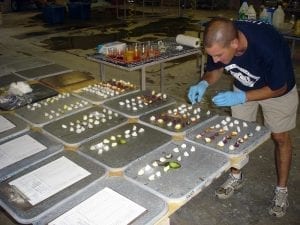
3. Saturate a clean cotton ball with the substance, place it on the concrete in the correct spot (the intersection of the substance number and the time period you are testing) and let it sit undisturbed for the allotted time. The cotton balls keep the liquid from migrating and provide a small reservoir that keeps the liquid from prematurely drying out.
4. At the end of the period of exposure:
– Clean up the residue a wet sponge and a mild cleaner (a dilute solution of 1 teaspoon of dish soap to 1 quart of water solution).
– Rinse the affected area with water and let it dry.
– Evaluate it for staining and sheen change.
– Re-wet the surface with plain water to evaluate penetration.
Stain Test Scoring System
For each substance and each timeframe, evaluate and assign scores for each of the following criteria. Remember to assign scores based on the principle “it either changed or it didn’t”.
– Staining:
- No change: 10 points. The area looks exactly like it did before testing.
- Temporarily stained but can be completely bleached out or cleaned off: 7 points
- Permanently stained, discolored, blush, etched: 0 points
– Sheen Change:
- No change: 10 points.
- Temporarily dulled, but returns to original sheen on its own within a few hours: 7 points.
- Permanently dulled: 0 points.
– Penetration: Perform this test after the area has been cleaned, rinsed, dried and evaluated for staining and sheen change.
- No penetration of water applied to the tested area: 10 points.
- Penetration of water that darkens the concrete in the tested area: 0 points.
How to Assemble and Analyze Test Data
As you do each test, keep track of the results on a spreadsheet or piece of paper with fields for each variable.
For example, here is a filled out spreadsheet for a stain test.
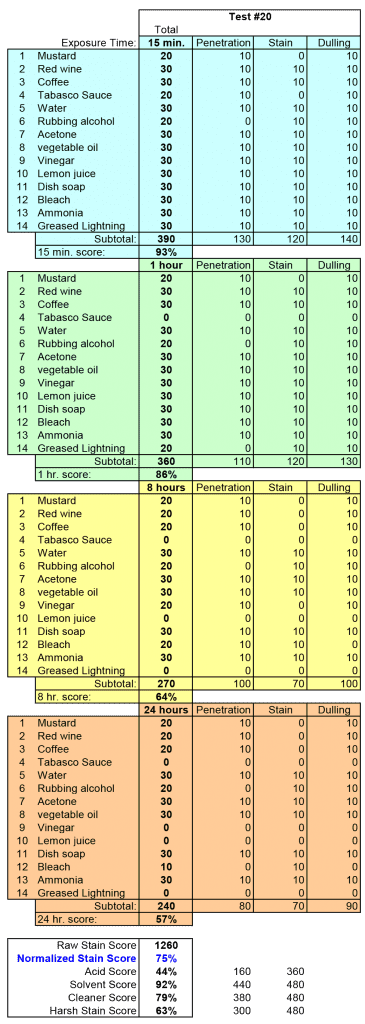
The following explains how the percentages in this example were calculated:
– Normalized Score
For each time increment, the scores for each staining agent are added up to produce a Subtotal. There are a maximum 30 points that can be awarded for each agent. In the case above for the 24 hour increment, the subtotal raw score is 240 points. Since there are a total of 14*30=420 points per time increment, the normalized 24 hour score is 240/420=57%.
The Raw Stain Score is the sum of the four time increment subtotals. For the example above, the raw stain score is 390+360+270+240=1260 points.
The Normalized Stain Score is the Raw Stain Score divided by the maximum possible total points. In this case, since there are a total of 4*14*30=1680 points, the Normalized Stain Score is 1260/1680=75%.
– Acids
The normalized Acid Score is the sum of the scores for just acidic materials divided by the total possible score for acidic materials. The acidic agents considered are Tabasco Sauce, vinegar and lemon juice.
The cumulative Acid Score is: [20+30+30]15min+[0+30+30]1hr+[0+20+0]8hrs+[0+0+0]24hrs=160 points.
The total possible score for these three agents over the four time increments is 3*30*4=360 points. The resulting normalized Acid Score is 160/360=44%.
– Solvents
The normalized Solvent Score is the sum of the scores for just solvents divided by the total possible score for solvents. The solvents considered are water, rubbing alcohol, acetone and vegetable oil.
The cumulative Solvent Score is: [30+20+30+30]15min+[30+20+30+30]1hr+[30+20+30+30]8hrs+[30+20+30+30]24hrs=440 points.
The total possible score for these four agents over the four time increments is 4*30*4=480 points. The resulting normalized Solvent Score is 440/480=92%.
– Cleaners
The normalized Cleaner Score is the sum of the scores for just cleaners divided by the total possible score for cleaners. The cleaners considered are dish soap, bleach, ammonia and Greased Lightning.
The cumulative Cleaner Score is: [30+30+30+30]15min+[30+30+30+20]1hr+[30+20+30+0]8hrs+[30+10+30+0]24hrs=380 points.
The total possible score for these four agents over the four time increments is 4*30*4=480 points. The resulting normalize Cleaner Score is 380/480=79%.
– Harsh Stains
The normalized Harsh Stain Score is the sum of the scores for just harsh stains divided by the total possible score for harsh stains. The harsh stains considered are mustard, red wine, coffee and Tabasco sauce.
The cumulative Harsh Stain Score is: [20+30+30+20]15min+[20+30+30+0]1hr+[20+20+20+0]8hrs+[20+20+20+0]24hrs=300 points.
The total possible score for these four agents over the four time increments is 4*30*4=480 points. The resulting normalized Harsh Stain Score is 300/480=63%.
The important thing to remember is that regardless of how you perform calculations using these numerical scores, if you perform the calculations consistently for two or more sealers, you have an objective basis to compare those sealers. For example, you may feel that different weights should be applied to Penetration, Staining and Dulling, rather than 10, 10 and 10. Or, you may feel that No Change deserves 10 points, Temporarily Stained deserves 5 points, and Permanently Stained deserves 0, rather than 10, 7 and 0. That’s fine. As long as you use a consistent system, you can compare sealers among your own tests. Your tests will not match the CCI scoring in that case, however.
Conclusion of Stain Testing Procedure
CCI has used this procedure to compare various sealers; you might use it only to thoroughly investigate how the one sealer you use behaves. This test procedure gives you a repeatable, consistent method to test any sealer you use or are considering using.
When you perform tests using this system, you can customize it. You may choose to weigh acids much higher than harsh staining agents, or vice versa. You might also choose to test more or different substances. In your own tests, choose a consistent weighting system, and be sure to perform all of the tests on all of the substances over various time periods.
See also this video about the stain testing procedure: