
When it comes to concrete countertop colors, choosing from a photo is a guess. This guide is for the pros who make those countertops – fabricators who need to deliver a specific, repeatable color to a client. If that’s you, the only reliable way to know how a pigment will look in your concrete – at your water content, with your finish, under your light – is to cast it yourself. That’s what color samples are for, and making them well is a skill in its own right.
The challenge is repeatability. A sample is useful only if you can reproduce that exact color on a full countertop months later. That comes down to two things: precise measurement and meticulous record keeping.
Every pigment behaves differently. Some are far more potent than others, some change the concrete’s workability or set time, and most stop adding visible color past a certain dose no matter how much more you add. Without a documented, repeatable process, you’re starting from zero every time.
This guide walks through the full method – from understanding how pigments are dosed as a percentage of cementitious content, to the precision scale you’ll need, to a complete mix design using PowerBlend and UltraFlow, and the step-by-step process of mixing, casting, curing, and finishing your samples.
Follow it carefully and you’ll come away with more than a set of color chips. You’ll have a documented library of colors you can scale to production with confidence, plus real knowledge of how each pigment behaves before it ever touches a paying client’s job.
Overview
Color samples are made with highly flowable concrete that does not contain fiber, and they are cast in smooth molds to create samples with a solid cream finish.
Samples cast this way are intended only to show the effects of different pigments and various pigment loadings. Alternative casting methods that show physical texture (such as hand-pressed) or exposed aggregate (terrazzo) may require variations in mix ingredients not specified here.
Each new color sample starts with its own batch of concrete, and all color samples use the same w/c ratio and UltraFlow dose when possible. The main variables for each batch are the pigment and its dose. Some pigments affect the workability of the concrete, so the UltraFlow dose may need to be altered to maintain the desired flowability.
Note: Careful measurements and meticulous record keeping are key to building a library of repeatable colors. Document all additions and modifications to each formula, along with any observations made during mixing and casting.
Pigments
Pigments are admixtures, which means they are dosed based on the total cementitious content (cement plus any pozzolans used in the concrete) and are proportioned by weight.
Pigment dosing is expressed as a percentage (%), which is the weight of pigment used divided by the total weight of cementitious material in the concrete. For example, a 1% dose means 1 lb of pigment was used in a batch of concrete that had 100 lbs of cement in it.
One pigment can make multiple color samples by varying the amount used in each sample, and this is the basis for making color samples. Larger doses yield more intense, saturated colors, while very small doses act as subtle tints to the base concrete color.
Low dose % ←  → high dose %
Tinting Strength
Each individual pigment has a different tinting strength, which means one pigment may need a higher dose to create an intense color while another may need a lower dose to reach a similar intensity. For example, black oxide is not as potent as carbon black, so it cannot make a rich, dark black color at similar doses.
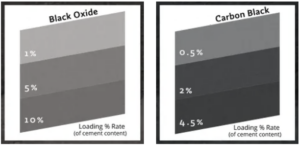
Mass Tone
Related to this is a pigment’s mass tone. The mass tone is the maximum dose that will yield a noticeable change in color.
Many pigments have a mass tone close to 5%. Increasing a pigment’s dose beyond the mass tone will not produce a visible change in color, and using high doses close to or exceeding 10% can significantly decrease the concrete’s strength as well as unnecessarily increase its cost.
Strength and Workability Effects
Finally, some pigments have characteristics that affect the concrete’s workability and even early strength development.
Some synthetic colors have superplasticizing characteristics and can also act as set retarders. In contrast, carbon black is well known for reducing workability and requiring more superplasticizer to overcome that effect.
Discovering a new pigment’s tinting strength and its effects on workability and set time is inherent in the color sample making process and should be documented, as this is important information to know for future use.
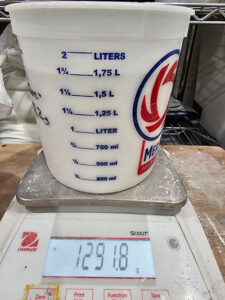
Scale
The most important tool in the color making process is an accurate electronic scale with fine resolution. For convenience, a scale that can weigh up to 2000 grams and resolve 0.1 grams makes measuring all of the ingredients simple and accurate.
The critical factor is the 0.1 gram resolution. This small increment permits accurate measurement of the small amounts of pigment used in each color sample, making it possible to scale the formula to larger production volumes with little deviation from the original.
Scales that resolve only 1 gram are not useful for making color samples, as they cannot measure small amounts of pigment with any reasonable accuracy.
Supplies
Materials needed:
- PowerBlend
- UltraFlow
- Sample pigments
- Water
Tools needed:
- Precision scale (0.1 g readability or better)
- Mixer (hand-held cake mixer or stand mixer)
- Silicone spatula
- Mixing bowl
- Ingredient containers
- Sample molds
Step 1: Plan and Measure Your Samples
- Determine how many color samples you will make for each pigment. Three is the minimum, while five provides a broader range that better reveals a pigment’s tinting strength. For three colors, doses of 1%, 2%, and 5% give a fairly good range. For five colors, 1/4%, 1/2%, 1%, 2%, and 5% gives a broader range that includes both subtle shades and more intense colors. Using more than a 5% pigment dose is not recommended.
- Weigh out all of the ingredients as precisely as possible for each color sample.
- Assign a sample number to each color sample and record the weights of all ingredients used for each one.
- Prepare the molds. Make sure they are clean, and write the color sample number on each mold to identify the resulting concrete sample.
Step 2: The Sample Mix Design
This sample mix design uses a w/c ratio that sits between the recommended minimum and maximum (0.30 to 0.34) for PowerBlend, and a corresponding UltraFlow dose (0.45%) that should produce a flowable mix without much, if any, segregation.
Batch ingredients for each color sample separately:
- PowerBlend: 1018 grams
- Water: 160 grams (w/c = 0.32)
- UltraFlow: 2.3 grams (0.45%)
This amount of concrete will make a sample approximately 8″ x 8″ x 1/2″ thick.
1018 grams of PowerBlend contain 500 grams of cementitious material. The pigment dose, UltraFlow dose, and water content are all based on this 500-gram content. A 1% dose = 0.01 x 500 grams = 5 grams of pigment.
| Pigment dose | Amount per sample batch |
|---|---|
| 0.25% | 1.3 g |
| 0.50% | 2.5 g |
| 1.0% | 5.0 g |
| 2.0% | 10.0 g |
| 5.0% | 25.0 g |
Those same doses require these pigment amounts per 45 lb bag of PowerBlend:
| Pigment dose | Amount per 45 lb bag of PowerBlend |
|---|---|
| 0.25% | 25 g |
| 0.50% | 50 g |
| 1.0% | 100 g |
| 2.0% | 200 g |
| 5.0% | 500 g |
Step 3: Mixing
- In a separate container, dry blend all of the pigment and UltraFlow into roughly 1/3 of the PowerBlend.
- Add all of the mix water to the mixing container. Use cold water for maximum fluidity. It is not necessary to use ice or water chilled with ice.
- Add the blend of pigment, UltraFlow, and roughly 1/3 of the PowerBlend to the water in the mixing container.
- Mix slowly to prevent splashing, and mix long enough to fully wet out all of the dry ingredients. Scrape the walls of the mixing container if necessary.
- Add about 1/2 of what’s left of the PowerBlend and mix slowly until all of the ingredients fully wet out and the mix becomes fluid without lumps.
- Slowly add the remaining PowerBlend while mixing to prevent clumping. The mix may stiffen up temporarily but should loosen and become fluid with continuous mixing. It is not necessary to mix at high speed. Scrape the bowl to incorporate any unmixed material back into the mixing charge.
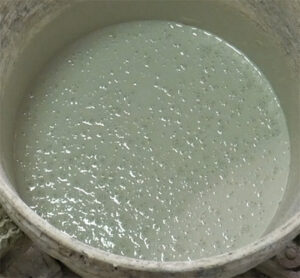
- Assess the consistency of the concrete. It should be fluid, thick, bubbly, and free of lumps. Add small amounts of UltraFlow if the mix is not yet fluid, and keep track of how much UltraFlow is used.
Step 4: Casting
- Allow the freshly mixed concrete to sit undisturbed for approximately 5 minutes after mixing is finished to let most of the entrapped air bubble out. This helps ensure the samples have fewer pinholes. Concrete that is not fluid will not release entrapped air bubbles.
- Prepare the molds. Label each mold with its color sample number. Make sure each mold is clean and has form release agent applied, if necessary.
- Pour the concrete into the mold slowly, holding the mixing container about a foot above the mold. Pour into a single spot near the middle of the form and let the concrete flow outward. This helps release trapped air in the mix.
- Gently tap, or raise and drop, the mold several times to further release trapped air bubbles.
- Cover the samples with plastic to trap moisture and prevent them from drying out. Make sure the plastic does not contact the surface of the fresh concrete. Then cover the plastic with one or more layers of blankets to trap the concrete’s self-generated heat.
Note: Cooler environments, high doses of UltraFlow, and some pigments may slow strength gain and require longer curing times before demolding is possible.
Step 5: Curing
- Allow the samples to cure while covered for a minimum of 20 hours. To test whether a sample is ready for demolding, drag a sharp implement or a wood screw across the exposed surface. If the concrete seems soft or dents or scratches easily, it is not yet hard enough and will likely crack during demolding. Let the sample sit in the mold for another 12 to 24 hours.
Note: Concrete generates heat during curing, and this heat is beneficial and accelerates early strength gain. Smaller volumes of concrete generate less heat and cool off much more quickly than larger castings. Covering the samples first with plastic and then with thick blankets helps trap that self-generated heat.
Step 6: Demolding and Finishing
- Demold the samples once they are at least 20 hours old and have passed the hardness test.
- Remove sharp edges with a diamond hand pad. A 120-grit hand pad works well and leaves a smooth finish on sample edges.
- Clean the concrete to remove dust and any form release residue, if you used a wax or a form release agent.
- Hone some or all of the sample if a salt-and-pepper (exposed sand grains) finish is desired. A 200-grit diamond hand pad is effective, as is aggressive wet sanding with 320-grit wet or dry sandpaper.
- Seal the samples. Ovation will leave the concrete looking more natural and non-color-enhanced. Omega will provide color enhancement.
Ready to Build Your Color Library?
Everything in this guide runs on the same core materials: PowerBlend, UltraFlow, and your choice of pigments. Stock up before your next sample session so you’re ready to start casting.
Shop PowerBlend
Shop UltraFlow
Want to learn mix design, color, and finishing hands-on with Jeff? That’s exactly what we cover in our hands-on training classes.