
Decorative aggregates, whether they are colored glass, crushed stone or other materials, can create interest and add pizzazz to a concrete countertop. This is one of the easiest and most fun ways to create an exciting custom look for your client. You can use recycled glass, elements of the room such as glass tile pieces, or even the client’s own mementos such as a broken vase.
There are two basic ways of getting the decorative aggregate into the concrete countertop:
- Method 1: Mix all of the decorative aggregate in with the concrete
- Method 2: “Seeding” or place the aggregate into the empty forms before the concrete is placed.
Both methods can be used together, and each has its pros and cons.
Mixing the aggregate into the concrete before casting is an easy way to achieve consistency, control and uniformity.
Since the decorative aggregate is mixed into the concrete, all surfaces will look the same. In addition, the average spacing of the aggregates is more uniform.
Because the total amount of ingredients is known, duplication of the concrete is easy. Varying degrees of exposure are controlled by altering the amounts (weights) of decorative aggregates used and the sizes of the aggregate particles. Larger aggregates have fewer particles per pound, so the overall coverage looks lower than with smaller aggregates.
The biggest disadvantage to this method lies in the amount of aggregate required. Only a small fraction of the decorative aggregate is actually exposed. Most of the aggregate never is seen, and this can significantly increase material costs.
Additionally, mix design adjustments may be necessary depending on the size and amount of decorative aggregate used. Large amounts of aggregate might call for substituting some of the other ordinary aggregate for some or all of the decorative aggregate, and it also might require a change in cement paste content or consistency.
However, if cost is not an issue and the client wants a random but uniform look, this is the easiest method.
To summarize, advantages are:
- More uniform spacing
- Easier to duplicate a random look
- Easy to do
Disadvantages:
- May be costly because more aggregate must be used
- May require mix design adjustment
Pre-placing the decorative aggregate into the forms is an alternative method that uses much less material. This method is very useful when the decorative aggregate is very expensive, only a small amount is available or specific patterns or locations of aggregates are desired. Sometimes aggregate is glued to the forms to prevent shifting, although this works best with larger pieces that have a distinct flat gluing surface.
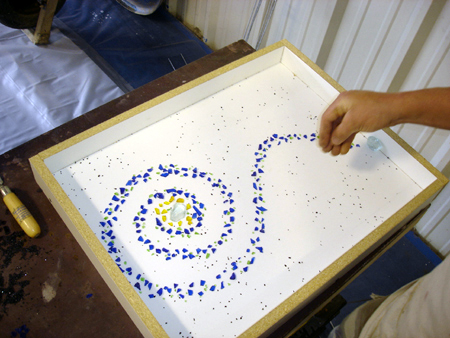
Disadvantages include the tendency for scattered aggregates to shift, move or get lost during casting. Also, edges and vertical surfaces are difficult to seed so that they match the surface.
Replicating the look of random, scattered aggregates can be tricky too, since the effects of concrete placement and consistency can have a strong influence on the final appearance.
Advantages:
- Uses less aggregate
- Allows for specific patterns or locations of aggregate
Disadvantages:
- Aggregate can shift or get lost during casting
- Hard to match edges
- Random look hard to replicate
Either method will require some degree of grinding to expose the embedded decorative aggregate. Larger, more rounded aggregates require the most grinding in order to expose some significant portion of their cross section. Small, angular particles take the least amount of grinding to expose.