
I’ve written a lot about the concrete aspect of concrete countertops. The next few posts on the blog will take a look at the other half of the equation: countertops. After all a concrete countertop is a countertop… one that just happens to be made of concrete. For beautiful concrete countertops you can’t forget countertop essentials like templating and installation.
In this post I’d like to share some tips for templating. Curvy walls and funky layouts will plague you no more once you master the basics of templating.
What is Templating?
Simply defined templating is the process of creating a pattern of the space where the countertop will go. It is a basic visual representation of front and back edges, sink holes, etc. that you can use when creating the countertop.
How Do I Template a Concrete Countertop?
How do you template for a concrete countertop? The answer is quite simple… just like you would any other countertop. When it comes to templating concrete countertops are like granite, marble, even laminate countertops. I’ve found that the least expensive method for creating a template is to use 2” to 3” wide strips of 1/8” plywood door-skin material held together with hot glue.
I like to use the wider width for front visible edges. I use smaller width pieces for cross sections and across the back. This allows me to easily see without any markings which edges are visible and which are not.
When templating a curvy wall (and if you’ve been in construction for any amount of time you know this is every wall), you can modify your template to show curvature. There are two different methods for accomplishing this: cut the template stock to shape or add markers to the straight template stock. Using straight template stock with little “fingers” protruding off to show curvature will save you time while still creating an accurate template.
If you’ll be using a backsplash you may not need to be this precise, but if there isn’t a backsplash or if the gaps are very large, this method can save you a great deal of time.
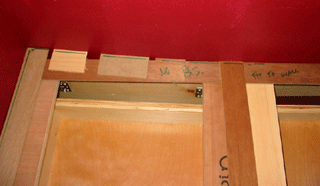
Notice in the photo that the edge is marked “No B.S. Fit to wall.” There are 3 fingers starting where the wall curvature starts. Attaching these fingers to the template took only a few seconds.
Essential Tools
You probably already have the basic tools for templating in your tool box. Although if you don’t most are easy to obtain and very affordable. Let’s take a quick look at some of my templating essentials:
- Door Skin– Door skin is a great templating material. It’s the thin strips of plywood laminate that are used to cover hollow frame doors. You can find this at your local home center.
- Hot Glue Gun– I like to hold my template together with regular hot glue. You can buy glue sticks and a glue gun at your local home center or craft store. It’s easy to use and very affordable.
- Compound Shears– I like to cut my templates with compound shears rather than a saw. It cuts down on material waste and leaves me with clean, straight lines.
- Plastic Speed Square– Choose a plastic speed square over metal when making a template. Plastic squares won’t damage hardwood cabinets or floors.
- Tape Measure– Don’t use a tape measure to measure countertop space; instead use it to measure existing fixtures.
- Pencils and Colored Markers– I use pencils and colored markers to make notes and markings on my template. Remember: take lots of notes and write everything down.
Tips for Templating
A beautiful countertop starts with an accurate template. Here are some tips for success:
- Always Template– It can be tempting to skip the template and just measure, but I’ve found that templating is always your best bet unless you are making a simple, freestanding piece with no sink holes. Spend an extra few minutes and create a template and save yourself from hours of headaches later when the countertop won’t fit.
- Mark Everything– Never assume that you’ll remember anything when making a template. Mark everything from the name of the job to the finished edges and even which side is up. Detailed notes are essential.
- Accuracy is Essential– If you want to create high quality countertops, accurate templating is essential. Don’t try to hurry the process or cut corners. Take your time and do it right. The quality of the final countertop depends on the accuracy of your template.
- Flush Edges Make for Square Corners– If you want your corners to be square, make sure your edges are flush.
- Involve the Customer– I like to show my customers the finished template and get them to sign off on it. This acts as a contract of sorts, showing that I created the countertop shape that was agreed upon even if the job site changes. Having a template protects me if outside factors cause the countertop to be too small or too big when it comes time to install.
To see templating in action, check out this short video of me templating for a concrete countertop installation.