
These are the instructional videos for how to reseal a concrete countertop using the Reseal Kit available on the Omega Concrete Countertop Sealer page. Please also read this page about resealing considerations and techniques.
- INTRO AND PREPARATION
- STEP ONE: Preparing the Surface – Masking and Removing Old Sealer
- 1a. Masking
- 1b. Hand Sanding Edges
- 1c. Using a Random Orbit Sander
- 1d. Removing Stains
- 1e. Filling Pinholes
- 1f. Cleaning
- STEP TWO: Mixing Urethane and Preparing Primer
- 2a. Mixing the Urethane
- 2b. Cleaning Syringes
- 2c. Diluting the Primer
- STEP THREE: Applying the Primer
- STEP FOUR: Diluting and Applying Finish Coats
- POST-SEALING EXPECTATIONS AND TROUBLESHOOTING
INTRO AND PREPARATION
What’s in the Reseal Kit
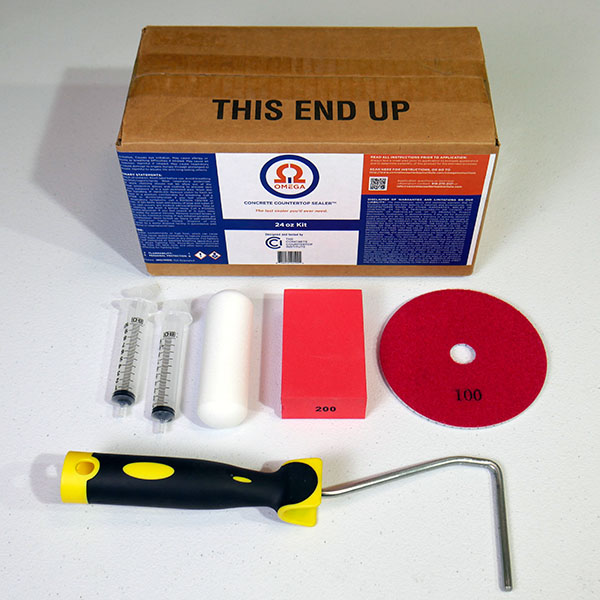
- 1 Omega Concrete Countertop Sealer kit
- 1 4″ foam roller
- 1 4″ handle
- 2 10ml syringes
- 1 100 grit 5″ diamond pad
- 1 200 grit hand pad
Tools Required
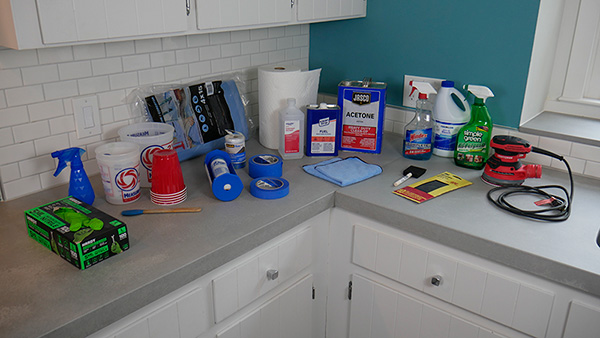
Please see this page for a complete list of tools and materials.
0a. When to Reseal Concrete Countertops
- How often you reseal depends on what was used in the first place.
- Wax, stone and tile repellents, and simple acrylics may need it yearly or more often.
- A high-performance sealer may need it rarely or never.
- Use and care matter too.
0b. Evaluating Your Existing Sealer
The specific technique being demonstrated in the videos is getting back to bare concrete by grinding off an existing thin-film sealer. Other steps or techniques may be necessary depending on the condition and type of your existing sealer.
Thick plastic coatings such as epoxy are soft and rubbery and cannot be ground off like hard, thin-film sealers can. For these coatings, you must first use a commercial paint stripper. You may need to repeat the process.
Wax is especially problematic because so many concrete countertops have been “sealed” with wax. The presence of even a tiny amount of wax will cause the failure of any high performance concrete countertop sealer coating, such as the Omega included in the Reseal Kit.
Once you have removed all traces of the coating or wax, clean and scrub thoroughly then proceed with Step One. While you will not be grinding off an existing coating in Step One, you still need to give the surface of the concrete the correct profile, or “tooth”, prior to resealing. This ensures the sealer develops a good mechanical bond with the surface.
Be aware also that some penetrating treatments that react with the concrete may affect the concrete at unknown depths. You can get back to bare concrete by grinding, but you may need to remove quite a bit of the surface in order to ensure you have eliminated all traces of the treatment. Doing so is very likely to open up pinholes that must be filled before resealing. Even then, we cannot guarantee that resealing will work in the case of penetrating treatments. Failure to remove all traces of the previous treatment will ensure the high likelihood of any new sealer peeling, Omega included. The outcome is highly dependent upon your effort, care and diligence, and even with good surface preparation success is not 100% guaranteed.
0c. Appearance Considerations
Physically grinding away the top layer of concrete removes all traces of contamination that will affect Omega’s bond to the concrete and creates the optimal surface profile to ensure good adhesion. However, it may change the appearance of the concrete. Polished concrete, cement-cream finishes, troweled surfaces, acid stained, dyed, or glazed concrete will no longer look the same. For example, grinding will remove brown acid stains and expose the bare concrete which is probably gray.
Another important consideration is color enhancement. Omega is color enhancing, meaning that it “wets out” the color of the concrete. If your concrete was previously sealed with a non-color enhancing sealer, it will look different after resealing with Omega. It will appear darker, and any color variations in the concrete will be more apparent. If you don’t want color enhancement, you can apply Ovation first, then Omega. See this page about how to combine Omega and Ovation sealers.
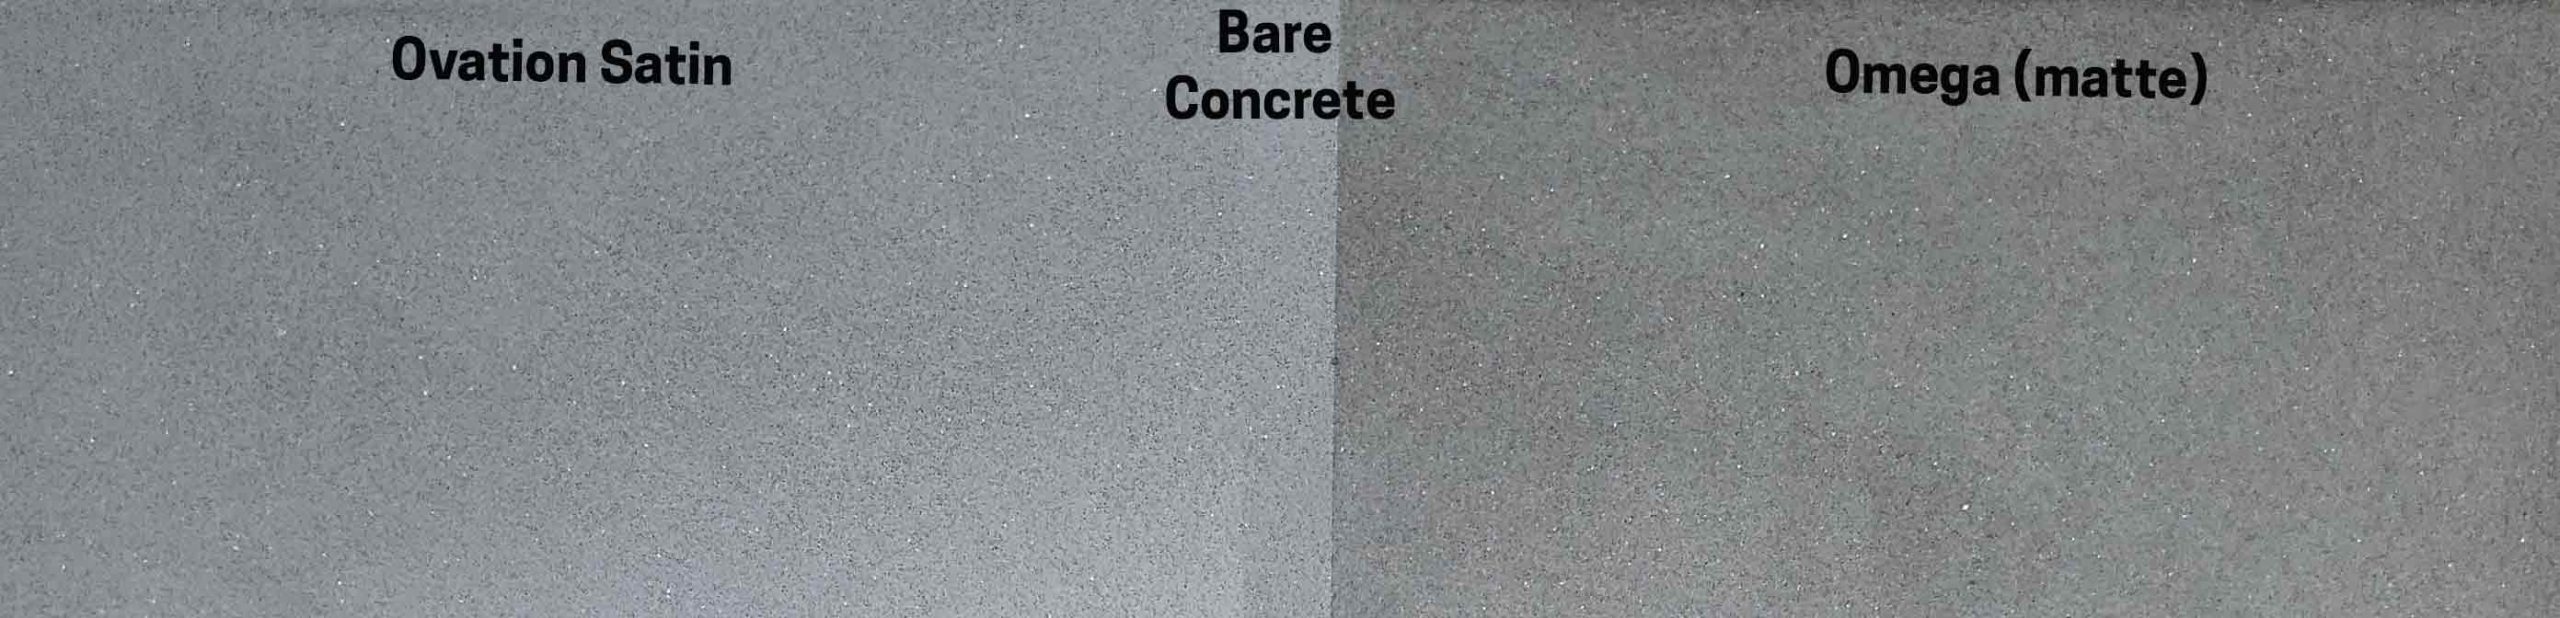
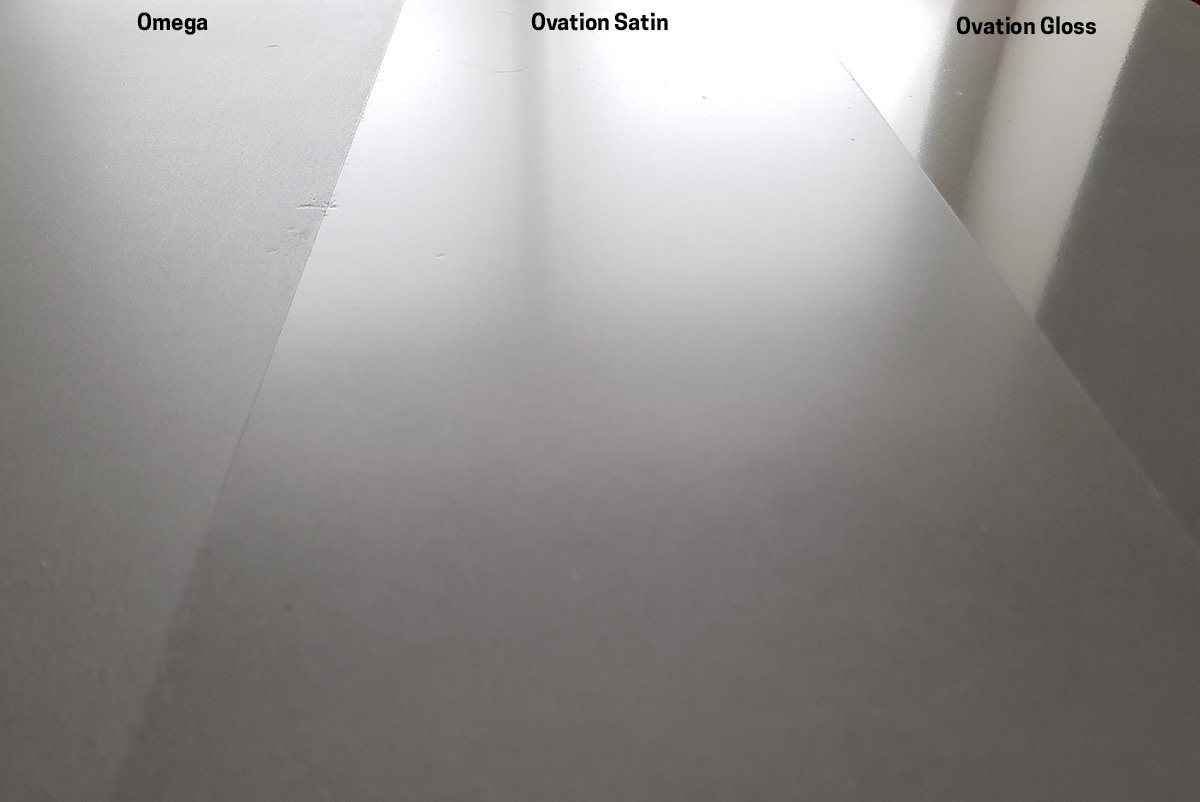
Omega has a matte sheen. If you want a satin or gloss sheen, you can apply Ovation on top of Omega. The how to combine Omega and Ovation sealers page explains this.
0d. Calculating Square Footage and Omega
- Once mixed, Omega has a one-hour pot life. Mix only what you can apply in that hour.
- Measure the countertops as simple rectangles, round to the nearest half inch, and estimate high. Divide square inches by 144 for square feet. This kitchen came to about 50 sq ft.
- Use the mixing chart at the end of the Omega instructions to convert square footage into Part A and Part B amounts. Download them from the website or the QR code on the box.
- Plan on two prime coats, so 50 sq ft needs enough primer for 100 sq ft: 20 ml Part A plus 10 ml Part B, according to the chart.
- Mix a little extra primer. Porous concrete is thirstier than the professional-grade concrete the chart assumes, and running short mid-coat leaves a visible line where the edge dried.
- Once you know how long a coat takes, you can judge how many finish coats to mix at once.
STEP ONE: Preparing the Surface – Masking and Removing Old Sealer
1a. Masking
- Clean the countertops thoroughly first with a household cleaner and scrub the surface to remove all dirt, debris, and grease.
- IMPORTANT: Jeff’s instruction to clean the countertops with household cleaner assumes that the concrete is not contaminated with grease, wax, food residue or other contaminants. See above about wax and epoxy especially.
- Mask the backsplash, walls, cabinet faces, floor, sink, and faucet.
- Mask up to the top edge if you’re only resealing the top. If you also need to strip the front edges, mask below them instead.
- Omega over Omega needs only the top surface reworked. If you’re resealing a different, inferior sealer, take the edges down to bare concrete too so everything matches.
- Removing the faucet makes the work easier. Leaving it on means masking it carefully to protect the finish, but gives you a water source right there. Be careful not to splash water on freshly applied sealer.
- Mask the sink even if you aren’t refinishing the inside edges. If you are stripping the inside, mask much more thoroughly to protect it from sanding grit and diamonds.
- Appliances need to be moved only for a more extensive reseal. Here the stove and refrigerator were simply covered in place.
1b. Hand Sanding Edges
- Do the hard-to-reach areas first, while your energy is fresh.
- Edge tools: 200 grit diamond hand pad and 400 grit wet/dry sandpaper.
- Open area tools: Random orbit sander with 100 grit pad.
- Work wet with a spray bottle of plain water. No dust, and the residue wipes up with a damp microfiber cloth.
- Move in circles, not straight lines, with light pressure. Let the diamonds do the work.
- You’re only removing the finish, not cutting into the concrete.
- Judge by look, feel, and sound. Bare concrete darkens when wet, feels grippy instead of slick, and sounds rougher under the diamonds.
- Remove 100% of the old finish. Any leftover patches will show through, and Omega won’t stick to peeling or bubbling sealer.
- Keep abrasives off the faucet and sink. They’ll scratch chrome, stainless, and porcelain even through tape.
1c. Using a Random Orbit Sander
- Use the 5-inch 100 grit resin diamond pad on the random orbit sander for the open areas.
- Keep the concrete wet. The sander generates more friction and dries the surface faster, so reapply water often and wipe up as you go.
- Move in a methodical pattern, much like sanding wood.
- A new pad may take a few moments for the resin to wear off and expose the diamonds. These pads last a very long time and won’t need replacing.
1d. Removing Stains
- After you have stripped off the old sealer, if there are any stains in the concrete, they must be removed before proceeding.
- Use this article about how to remove stains in concrete countertops.
1e. Filling Pinholes
- After you have stripped off the old sealer, if there are any pinholes in the concrete, they must be filled before proceeding.
- No coating sealer, including the Omega sealer in the kit, will fill pinholes. Even thick epoxies are not designed to fill pinholes.
- Use this article about how to fill pinholes in concrete countertops.
1f. Cleaning
- Softer sealers like acrylics will be much easier to remove than hard sealers like urethanes.
- Inspect for pinholes now that the surface is clean and dry. See 1e if you find any.
- Rinse thoroughly with clean, fresh water and new microfiber cloths, 3 or 4 times. Wipe with pressure, edge to edge, in sections.
- Let it air dry and inspect for streaks. Residue streaks will show through the sealer, and the only fix is starting over.
- Spot-check for leftover finish now and touch up with the hand pad, sandpaper, or sander.
- Optional but recommended: a final wipe with isopropyl or denatured alcohol on a new cloth. It lifts residue and dries the surface. Ventilate – it’s flammable.
- Confirm masking is still secure before sealing.
STEP TWO: Mixing Urethane and Preparing Primer
2a. Mixing the Urethane
- Mix Part A and Part B at a 2:1 ratio by volume using the syringes provided.
- Stir thoroughly 30 seconds to a minute, scraping bottom and sides, until no clear swirls remain.
- Let the mixture rest for 5 minutes (induction time) before diluting with water. It is critical that you allow a full 5 minutes.
- Have two separate containers of water ready – one for dilution and one for rinsing/cleaning. Never mix them!
2b. Cleaning Syringes
- Clean the syringes during the 5 minute induction time. You’ll need them again for the finish coat batch.
- Draw cleaning solution into each syringe and squirt it into a separate container for the dirty solution.
- Follow with a clean water rinse. Never let acetone get into the sealer – it will keep the sealer from working.
- Pull the plunger out and dry the syringe so no water droplets remain.
- Spilled Part A or Part B wipes up easily with acetone on a paper towel.
2c: Diluting the Primer
-
- Dilute the primer at a ratio of 1 part urethane to 7 parts water.
- You can mix more urethane than you need for the primer and reserve the leftover for your finish coats – the mixed urethane has about an hour of pot life, so there’s no rush.
- Use the mixing chart in the instructions to calculate how much you need – a little goes a long way. 8 oz of diluted primer covers about 100 sq ft.
- Wait the full 5 minutes of induction time before diluting – you can go longer, but don’t rush it.
STEP THREE: Applying the Primer
3a. Applying 1st Primer Coat
- Spray a small area, spread with the roller, then back-roll with light, quick strokes to remove excess and bubbles.
- Be generous with the first coat. Bare concrete is thirsty, and slightly heavy is better than too thin.
- Work fast – keep the surface wet while working. No drips or pools.
- If the roller makes bubbles instead of breaking them, it’s holding too much. Squeeze it out or blot it with a paper towel.
- For edges and verticals, apply sealer directly onto the roller to avoid overspray.
- Once the surface goes from shiny to dull, stop – don’t touch it.
- Wait for the entire surface to go dull before applying the next coat. Time varies with humidity, temperature, and air movement.
- The primer isn’t protection. It reduces the concrete’s porosity so the finish coats, which have less water in them, lay out properly.
3b. Applying 2nd primer coat
- The second primer coat goes on much faster because the surface is less porous.
- Use less material than the first coat – the concrete won’t absorb as much.
- Same technique: spray, spread, lightly back-roll. Soak up any excess – don’t let pools dry on the surface.
- Enclosed areas like sinks stay damp longer due to trapped humidity; just wait until they’re fully dry before re-coating.
- Primer coats do not provide stain protection – they only reduce porosity so the finish coats lay down and look good.
STEP FOUR: Diluting and Applying Finish Coats
4a Mixing, Inducting and Diluting the Finish
- Mix only what you can apply within the one hour pot life.
- Mix urethane – 2 parts of Part A to 1 part of Part B.
- Let sit to induct for 5 minutes.
- Clean the syringes during the induction wait.
- Dilute 1:1 – 1 part urethane to 1 part water.
- The foam roller from the prime coats can be rinsed, squeezed out and stored in a plastic bag so it doesn’t dry out.
4b Applying 1st Finish Coat
- Same process as the primer: spray, spread, back roll with light pressure.
- Finish coats are thicker and less watery, and look milkier going on.
- Don’t spread it as far as the primer. It still needs to be wet when you back roll.
- Work in small sections, about a foot wide or less.
- Back roll with light pressure just until the big bubbles go away. Don’t overwork it.
- Bubbles that keep appearing mean the roller is getting too wet.
- Push into what you just laid down. Always wet on wet, so there are no lines between sections.
- Once a section looks good, leave it alone. Make sure it’s right before moving on.
- If it starts drying out on you, you’re spreading it too thin, spreading too far, or taking too long. It should always be wet and shiny.
- Use the glare to check your work, especially along the edges – those are easy to miss.
- Neither too thin nor too heavy. Applied correctly it flows out and levels itself.
4c Applying 2nd Finish Coat
- Wait for the water to flash off, usually 10 to 15 minutes. Don’t go more than about half an hour between coats unless there’s still moisture on the surface.
- Every coat goes on the same way. Primer and finish, first coat and last, all use the same technique.
- Spread, then back roll with light pressure – just the weight of the roller held with your fingers – to knock the bubbles down.
- Don’t overwork it. The finish does the work of making itself look good through surface tension.
- If the surface looks milky white, it’s too heavy. It should flow out clear.
- Small dull circles where the urethane separates from the water are normal and don’t show in the final finish.
- A roller that’s getting full makes bubbles. Squeegee or blot it out and spread a little broader to dry it down. Don’t spread so thin that it dries fast and leaves texture.
- Spray a little extra where you’re using a foam sponge, then blot up the excess. Sponges don’t lay out as well as the foam roller.
- If you miss a small spot and it’s already dulled, leave it. The next coat covers it. That’s part of why four coats are applied. Don’t miss a whole area though.
- Get down low and check the sheen. Dull spots are misses, rough-looking areas have bubbles, and good areas are shiny and even.
4d Applying 3rd and 4th Finish Coats
- Coats can be split across days. If the finish still feels waxy or tacky, it’s still curing – apply the next coats directly, no sanding needed.
- Work only while the finish is wet and glossy. Over-rolling a dry, dull surface leaves roller texture you’ll have to sand out.
- Fish eyes or shiny spots roll out in a few seconds while the finish is still wet.
- Work in small sections, blending into what you’ve already laid down to avoid roller lines.
- Use the glare to guide you. Dark areas without glare are easy to miss, so double-check them.
- Back roll in random directions to avoid a grid pattern.
- Don’t neglect the front and back edges.
- Pick out hairs and fur with your fingers and roll over the spot. Lint-roll yourself first if you have shedding pets.
- Rub the inside of the sink with vegetable oil as a release agent. Overspray
won’t stick, and acetone removes any fresh overspray. - Early coats don’t need to look perfect. As long as there are no bumps or drips, later coats blend everything out.
POST-SEALING EXPECTATIONS AND TROUBLESHOOTING
5a Post-Sealing Expectations
- The day after sealing, the finish feels gummy, waxy, or tacky. That’s the urethane starting to cross-link. It’s soft and vulnerable at this stage, so stay off the countertops for a day or two.
- Wait until the surface feels hard and smooth and has completely lost that rubbery, tacky feel.
- Be gentle for the first 2 to 3 days. Once the surface feels hard and smooth, appliances and normal use can resume. Use a cutting board.
- Full cure takes 7 to 10 days, typical of two-part finishes. The finish keeps getting harder and tougher over that period.
- Once cured, Omega is extremely stain resistant. Red wine for 24 hours, lemon juice overnight, olive oil for weeks – no problem. Spills don’t have to be wiped up immediately.
5b Removing Dust Nibs in Cured Sealer
- Once cured, you may feel small specks of roughness. These are nibs – dust and lint that settled into the wet sealer. They can easily be sanded out.
- Sanding too soon will ruin the finish. Wait until the surface feels hard and smooth and has completely lost any rubbery, tacky feel.
- Use 800-grit sandpaper that’s been roughed up with the 200 grit hand pad.
- Apply barely any pressure – just enough to make contact with the nibs. You’re shaving off dust nibs, not sanding the finish.
5c Removing Edge Ridges
- Because the edges weren’t sealed, a small ridge of sealer formed where the top of the masking tape was.
- Remove it with the same softened sandpaper, working the edge with a feather touch and almost no pressure.