
Welcome to the most thorough and detailed instructions of any sealer on the planet. On this page we provide you with everything you need to be successful with the instructions for Omega Concrete Countertop Sealer. Omega is a professional grade sealer that requires some study and practice. It is essential to watch and read the full documentation before applying the sealer. Give yourself some time to understand the process and to practice on a sample before attempting to seal your first project.
TABLE OF CONTENTS
Information that you should review first:
- Read the FAQs – MASSIVE AMOUNTS OF INFORMATION ABOUT EVERY QUESTION EVER ASKED ABOUT OMEGA!!! READ THIS!!! The FAQs give answers to questions about all sorts of topics such as what to do if you get dust in your sealer, find any chunks in it, or spill water on it, as well as information about performance against stains, acids, scratches, heat, cold, UV and water.
All of the information:
- Important Notes
- Written Instructions
- Training Videos
- Coverage Rates
- Documentation for Your Clients: Care and Maintenance Guide, Scratch Repair Instructions
- Data Sheets
- Disclaimer
IMPORTANT NOTES
|
YOU MUST TEST OMEGA ON A TRIAL SAMPLE BEFORE SEALING A REAL PROJECT FOR THE FIRST TIME. Different concrete mix designs, casting techniques, curing regimens, surface processing techniques, environmental conditions, etc. will influence how well Omega is applied and how it looks. |
- ***Be sure to use an induction time of a full 5 minutes.*** See the written instructions for more information.
- Threads, lids and tools must be cleaned thoroughly after each use. They are effectively cleaned with water and acetone. Uncured Omega, as well as the liquid Part A and Part B, can be cleaned up by first rinsing with fresh water, and then with a scrub or rinse with acetone. An acetone and water mixture (at least 20% acetone) works too. Acetone will not affect cured Omega, so do not let Omega cure on your tools.
- Do NOT over-backroll. The surface needs to stay wet. Do NOT continue to backroll once the surface starts to dry out. Pay attention to the amount of backrolling done in the videos.
- Strain sealer before applying
- Do not dry grind to prepare the surface. Wet grinding only. You can fix it if you already dry ground. See this article.
WRITTEN INSTRUCTIONS
- Click here to download the written instructions.
- IT IS CRITICAL TO READ THE WRITTEN INSTRUCTIONS AS WELL AS WATCHING THE VIDEOS. PLEASE DO NOT RELY ON THE VIDEOS ALONE.
TRAINING VIDEOS
IMPORTANT: Please read the Written Instructions as well. They contain important information that is not included in these videos.
- STEP ONE: Surface Prep
- 1a. Introduction
- 1b. Surface Prep
- STEP TWO: Mixing Urethane and Preparing Primer
- 2a. Mixing the urethane
- Tip 2a1. Dry gas
- Tip 2a2. Part B rim
- Tip 2a3. Cleaning syringes
- 2b. Diluting the primer
- 2c. Preparing the foam rollers
- STEP THREE: Applying the Primer
- STEP FOUR: Diluting and Applying Finish Coats
- POST-SEALING EXPECTATIONS AND TROUBLESHOOTING
STEP ONE: Surface Prep
1a. Introduction
- Omega is a two-part urethane sealer (Part A and Part B) used by thousands of professionals worldwide for maximum stain resistance and durability.
- Syringes, foam rollers, and a pump sprayer are needed for application. These can be purchased separately or in the Omega Full Kit.
- Omega is mixed at 2 parts A to 1 part B by volume, measured with syringes.
- Omega is applied with a hand pump sprayer, then spread and excess removed with a foam roller.
- CCI’s specialty foam rollers are denser and more consistent than generic paint rollers, which can vary in absorbency and sometimes just push material around instead of removing it.
- Omega cures to a matte, color-enhancing finish – no stirring or shaking needed before use.
- One Part A/Part B covers 170+ sq ft across both prime and finish coats.
- Read the instructions thoroughly – they include a mixing chart to calculate exactly how much material to mix based on your square footage.
1b. Surface prep
THIS IS CRITICAL! Please review the important information and videos on this page.
STEP TWO: Mixing Urethane and Preparing Primer
2a. Mixing the urethane
- Mix Part A and Part B at a 2:1 ratio by volume using the syringes provided. Stir thoroughly to fully incorporate both parts.
- Let the mixture rest for 5 minutes (induction time) before diluting with water. It is critical that you allow a full 5 minutes, because shorter induction times result in a higher likelihood of water penetrating the cured sealer.
- Prime coats are diluted 1 part urethane to 7 parts water – this acts as a sanding sealer to reduce the porosity of bare concrete so that the finish coats lay out more evenly.
- Have two separate containers of water ready – one for dilution and one for rinsing/cleaning.
Tip 2a1. Dry gas
- To extend the shelf life of your Omega components, purge the containers with a dry gas blanket after each use to displace humid air.
- Humid air reacts with the components and slowly degrades them over time, especially if you open the containers repeatedly.
- Options include canned argon (such as Bioxygene), nitrogen, or Smooth-On’s “Xtend-It.”
Tip 2a2. Part B rim
- After using Part B, wipe the can rim with acetone to remove any residue – it dries into a brittle, super glue-like bond that can make the lid very difficult to reopen.
- If the lid does get stuck, gently work it up with a paint can opener and tap it back down with a mallet to break the bond. Avoid prying hard, as this can distort the thin metal rim and prevent a proper seal.
- CCI also sells screw-top plastic jars as an alternative storage option.
Tip 2a3. Cleaning syringes
- To reuse your syringes, clean them promptly using water with a small amount of acetone added.
- Draw the cleaning solution through each syringe and expel the dirty rinse into a separate cup to avoid contaminating your main rinse container.
- Pay extra attention to the Part B syringe – the tip and rubber plunger need thorough cleaning since the thick, syrupy material will dry and glue itself together if left uncleaned.
2b: Diluting the primer
- Dilute the primer at a ratio of 1 part urethane to 7 parts water.
- You can mix more urethane than you need for the primer and reserve the leftover for your finish coats – the mixed urethane has about an hour of pot life, so there’s no rush.
- Use the mixing chart in the instructions to calculate how much you need – a little goes a long way. 8 oz of diluted primer covers about 100 sq ft.
- Wait the full 5 minutes of induction time before diluting – you can go longer, but don’t rush it.
2c: Preparing foam rollers
- Before use, dampen your foam roller with clean water and squeeze out the excess – damp, not soaking wet.
- Do not dip the roller in your rinse water, as getting acetone into your urethane will cause problems.
STEP THREE: Applying the Primer
3a. Applying 1st Primer Coat
- Spray a small area, spread with the roller, then back-roll with light, quick strokes to remove excess and bubbles.
- Work fast – keep the surface wet while working. No drips or pools.
- Once the surface goes from shiny to dull, stop – don’t touch it.
- Wait for the entire surface to go dull before applying the next coat (can be as quick as 10 minutes in warm weather).
- For edges and verticals, apply sealer directly onto the roller to avoid overspray.
3b. Applying 2nd primer coat
- The second primer coat goes on much faster because the surface is less porous.
- Use less material than the first coat – the concrete won’t absorb as much.
- Same technique: spray, spread, lightly back-roll. Soak up any excess – don’t let pools dry on the surface.
- Enclosed areas like sinks stay damp longer due to trapped humidity; just wait until they’re fully dry before re-coating.
- Primer coats do not provide stain protection – they only reduce porosity so the finish coats lay down and look good.
STEP FOUR: Diluting and Applying Finish Coats
4a Diluting the finish
- Finish coats are diluted 1:1 (equal parts urethane and water).
- Keep an eye on the clock – you have about an hour of pot life from when you first mixed Part A and Part B.
- Minimum coat recommendations: 4 coats for kitchens and bathrooms, 3 minimum for bathroom sinks, 2 minimum for light-duty pieces like end tables.
- Omega can be used in wet areas (showers, tubs, sinks), outdoors, and in freezing conditions. It does not yellow.
4b Applying 1st finish coat
- Same technique as primer: spray, spread, back-roll with light pressure. Work a bit faster – finish coats have more urethane and dry quicker.
- The roller’s job is to remove excess and pop bubbles. Don’t over-roll or chase every tiny bubble – the material self-levels into a smooth, thin film once the excess is removed.
- If your roller gets saturated, blot it on a clean lint-free cloth to restore its absorbency.
- Common mistakes: leaving too much material on the surface, or over-rolling until it starts to dry and creates texture.
- If you need to stop and come back the next day, you likely don’t need to sand – Omega takes 24-36 hours to fully cure. If it still feels slightly waxy or greasy, it’s still active and you can apply more coats directly. Once it feels hard and dry, do a light scuff sand before continuing.
- If you get debris (dog hair, a fly) on the surface, wait for the water to evaporate, then wipe it off. Don’t touch it while still wet.
- If you accidentally create texture or a run, let it fully cure, then lightly sand with 400-grit. Don’t sand through the coating – just knock down the roughness.
4c Applying 2nd+ finish coat
- Same technique as before – spray, spread, light back-roll. Work only while the finish is wet and glossy.
- Work at a deliberate pace – move quickly but don’t rush.
- Resist the urge to go back and fix small imperfections. Leave it alone – it will level out on its own. Going back will only make it worse.
- Practice on a test piece before doing a real project.
- For reference, Jeff completed two prime coats and two finish coats in under 40 minutes of real time.
POST-SEALING EXPECTATIONS AND TROUBLESHOOTING
5a Post-Sealing Expectations
- Omega is an aliphatic urethane that takes 7-10 days to reach full cure – this is normal for this type of finish.
- In the first 16-24 hours, the surface will feel waxy, greasy, or gummy. This is the urethane still curing, not a defect. In this state you can still apply additional coats without sanding, but do not use the piece or get it wet.
- Wait a minimum of two full days after sealing before installing or using the piece. When you do start using it, use it gently – the finish is still gaining strength.
- The piece will appear darker and shinier right after sealing due to residual moisture. This will lighten and the sheen will drop as it dries and cures.
- Warmth speeds up curing. Keep the concrete at 80-85°F continuously for a day or so if you want to accelerate the process. A cool shop (60°F) can add a day or two to cure time.
- Just because the water has evaporated doesn’t mean the sealer is cured – like concrete, it cures through a chemical reaction that takes time and warmth.
5b Appearance of Cured Sealer
- Omega cures to a soft, natural sheen – not dead flat, not shiny. It looks and feels very similar to bare concrete.
- This natural appearance is intentional – the goal is to protect the concrete while keeping its natural look and feel.
5c Removing Dust Nibs in Cured Sealer
- It’s common for dust to settle into the finish while it cures, leaving a slight roughness. This is easy to fix.
- Use 600-grit sandpaper (or finer – 800 or 1000). Do not go coarser than 600, or you risk removing material.
- Apply barely any pressure – just enough to make contact. You’re shaving off dust nibs, not sanding the finish.
- A well-worn sanding pad (such as a 220-grit foam pad rubbed down on bare concrete until it feels very fine) also works.
- Be especially careful if you only applied two finish coats – it’s easy to sand through a thin, still-curing finish.
- You only need to do this once. The result should feel silky smooth with almost no visible dust from sanding.
5d Sanding Out Drips or Roughness
- For drips, runs, or roller texture (not just dust), wait until the finish is fully hard, dry, and smooth with zero tackiness – typically 1.5 to 2 days after sealing, depending on shop temperature.
- Use 400-grit sandpaper, dry, with a sanding block. Do not go coarser than 400. Sand just enough to level the texture – you don’t need to remove the finish entirely.
- If you accidentally sand through to bare concrete, treat that spot like a fresh start – prime it and then apply your finish coats.
5e Spot Repairs
- Spot repairs are possible, but the repaired area may have a slightly different sheen since cured Omega is chemically inert and won’t melt back into itself like an acrylic.
- For an invisible repair, don’t just fix the spot – recoat the entire surface that’s in the same plane:
- Scuff sand the whole surface lightly with 400 or 600 grit (just enough to prepare it, not remove finish).
- Clean with denatured or isopropyl alcohol and let dry 10-20 minutes.
- Double-prime the bare spot, then apply 2 finish coats over the entire surface.
- You only need to recoat surfaces in the same plane as the repair – not the sink, edges, or other areas.
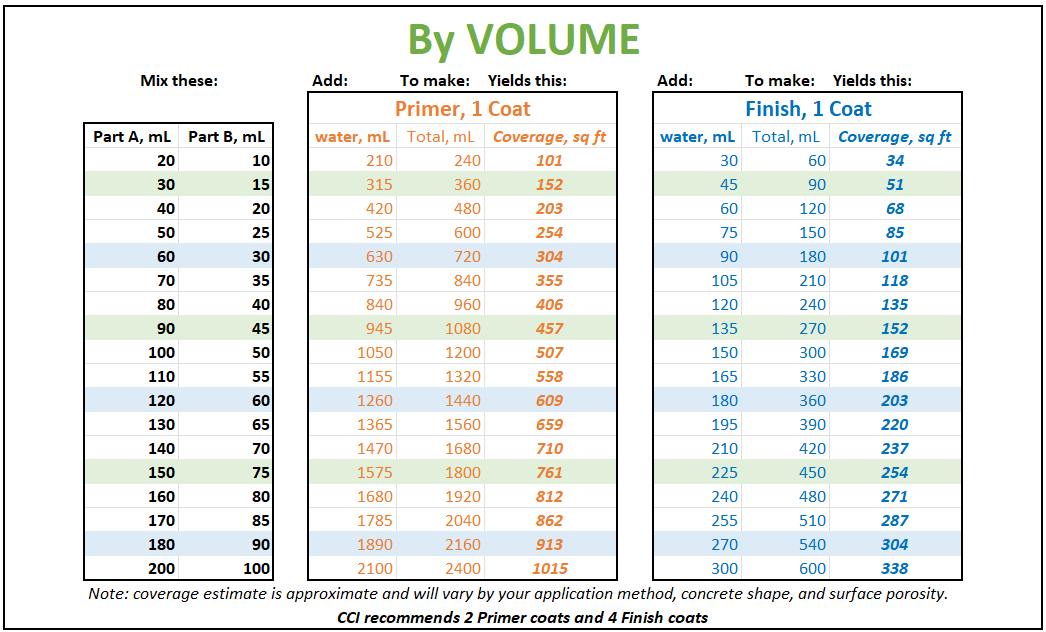
COVERAGE RATES
When measuring by volume:
DOCUMENTATION FOR YOUR CLIENTS
Setting expectations with your clients is critical for any sealer. This starts before the sale and extends to after the sale. By handing out the following documentation to your customers upon installation, you will address any questions they have about how to care for their concrete, prevent problems, and reduce calls to you for simple maintenance that your clients can perform themselves. Click here to download the Omega Care and Maintenance Guide. Click here to download the Omega Scratch Repair instructions.
DATA SHEETS
Click here to download the Technical Data Sheet. Click here to download the Safety Data Sheet for Part A. Click here to download the Safety Data Sheet for Part B.
DISCLAIMER OF WARRANTIES AND LIMITATIONS ON OUR LIABILITY
The manufacturer solely and expressly warrants that its products shall be free from defects in materials and workmanship. THE MANUFACTURER MAKES NO OTHER WARRANTIES, IMPLIED OR OTHERWISE, AS TO THE MERCHANTABILITY OR FITNESS FOR ORDINARY OR PARTICULAR USE OF ITS PRODUCTS. Product descriptions, illustrations, or demonstrations, if any, are for illustration purposes only and do not constitute a warranty or warranty alteration. Listed physical properties are typical and should not be construed as specifications. NO WARRANTY IS MADE, EXPRESSED, OR IMPLIED, REGARDING SUCH OTHER INFORMATION, THE DATA ON WHICH IT IS BASED, OR THE RESULTS YOU WILL OBTAIN FROM ITS USE. NO WARRANTY IS MADE THAT THE USE OF SUCH INFORMATION OR OUR PRODUCT WILL NOT INFRINGE UPON ANY PATENT. Upon purchase, handling, storage, and application of products are beyond control of the manufacturer. The manufacturer specifically does not warranty performance results. The purchaser should conduct a test prior to application and shall be solely responsible for determining the suitability of products for the purchaser\’s intended purposes. The manufacturer shall bear no liability, other than the replacement of the defective product. The purchaser shall have no claim for incidental or consequential damages. Acceptance of delivery of our product means that you have accepted the terms of this warranty whether or not purchase orders or other documents state terms that vary from this warranty. No representative is authorized to make any representation or warranty or assume any other liability on our behalf with any sales of our products. This product contains chemicals that may CAUSE SERIOUS PHYSICAL INJURY. BEFORE USING, READ THE MATERIAL SAFETY DATA SHEET AND FOLLOW THE PRECAUTIONS TO PREVENT BODILY HARM.